
Ultimate Guide to Immersive Brand Storytelling Displays
Immersive brand storytelling displays are transforming how businesses connect with audiences. By blending sensory elements like sight, sound, and scent with interactive technologies such as augmented reality and projection mapping, these displays create memorable experiences that go beyond static visuals. The key is to design spaces that tell a clear story, engage visitors emotionally, and encourage meaningful interactions.
Key Takeaways:
- Impact on Consumers: Boosts brand recall by up to 70% and increases purchase intent, with 91% preferring personalized experiences.
- Design Essentials: Use lighting, tactile materials, and distinct zones to guide visitors through your story.
- Technology Integration: Tools like QR codes, AR/VR, and projection mapping enhance engagement and bridge physical and digital experiences.
- Display Systems: Modular setups like TRIGA® GO (portable) and TRIGA® MAX (large-scale) offer flexibility and ease of use.
By focusing on storytelling, sensory engagement, and practical design, you can create displays that leave a lasting impression and drive real results.
Building Your Brand Story
Craft your display around a clear and cohesive brand identity by addressing three essential questions: Who are you? What do you do? Why does it matter? Answering these helps unify your graphics, products, and messaging into a story that resonates emotionally with visitors.
Start by defining your core values – whether it’s innovation, community impact, or environmental responsibility. These values should guide every design decision. For instance, a brand emphasizing sustainability might use eco-friendly materials and earthy colors, while a tech-forward company could lean into sleek metallic finishes and bold, futuristic lighting.
As Nomadic Display highlights:
“Your brand story is more than just a recounting of events or achievements; it is a reflection of your values, vision, and ethos.” – Nomadic Display
Setting Your Themes and Objectives
Clear objectives and measurable goals (like KPIs) are the foundation for making purposeful design choices. From booth layout to messaging, these objectives ensure your display connects with your audience and achieves its purpose. Your theme acts as the visual and emotional glue, tying all these elements together to create instant recognition and set you apart from competitors.
Dane Giles, Director of Creative at STAR, explains it well:
“Think of your booth as a visual elevator pitch: focused, purposeful, and designed to spark curiosity.”
For example, if lead generation is your primary goal, design your layout to encourage easy conversations and ensure your team is approachable. If you’re focused on building brand awareness, include visually striking elements and shareable photo opportunities that leave a lasting impression.
Structuring Your Story
Think of your display as a narrative with a clear beginning, middle, and end. The beginning should grab attention, the middle should engage visitors, and the conclusion should inspire action.
Within your booth, create distinct zones to represent different parts of your story. One area might explore your brand’s history, another could showcase your current offerings, and a third might offer a peek into future innovations. Add personal touches like staff or customer testimonials to make your values more relatable and concrete.
This storytelling approach naturally guides your design and technology decisions, ensuring your display feels purposeful and impactful.
Designing Your Display
A well-designed display strikes a balance between eye-catching visuals and practical functionality. It should reflect your brand’s story while being approachable and easy to navigate. Visitors should feel drawn in, free to explore, and able to connect with your message. This balance is the foundation for crafting a space that tells your story through visuals, sensory details, and layout.
Think about the first impression your display makes. What grabs attention right away? What paths encourage movement throughout the space? These considerations influence every design decision, from your choice of colors to how you arrange product demonstrations.
Adding Visual and Sensory Elements
Lighting is a game-changer. It sets the mood, directs focus, and can turn an ordinary setup into something memorable. To create depth and texture, use three layers of lighting: ambient lighting for overall brightness, accent lighting (like spotlights) to showcase key elements, and decorative lighting (such as LED strips) for added flair.
As TRIGA Displays explains:
“Lighting is the secret ingredient that transforms textile displays from functional to unforgettable.”
For indoor events, aim for lighting with a Color Rendering Index (CRI) of 90 or higher and neutral color temperatures between 4,000–5,000K to ensure your graphics pop with vibrant, accurate colors. Cool blue tones can create a high-tech vibe, while warmer amber hues (around 2,700K) evoke a sense of comfort and intimacy. Position lights above eye level, and use diffusers to minimize glare on fabric surfaces. Textile panels absorb light, so thoughtful lighting placement is key.
Here’s a quick breakdown of effective lighting techniques for textile displays:
| Lighting Technique | Best Use Case | Application for Textile Displays |
|---|---|---|
| Edge Lighting | Outlining frames | Add LED strips along edges to emphasize structure. |
| Backlit Panels | Illuminating graphics | Place LED grids behind fabric for even, glowing visuals. |
| Spotlights | Highlighting key elements | Use adjustable heads to focus on logos or featured products. |
| Uplights | Large backdrops | Floor-mounted lights can evenly illuminate wide surfaces. |
But don’t stop at visuals – engaging other senses creates deeper connections. Research shows that scent has a powerful impact on memory, with people recalling smells 65% of the time after a year, compared to 50% for visuals. Consider adding a signature fragrance, curated soundscapes, or tactile materials that invite interaction. As Synergy Design Group puts it, “the right fragrance can quietly reinforce brand identity and spark emotional recognition long after the event ends”.
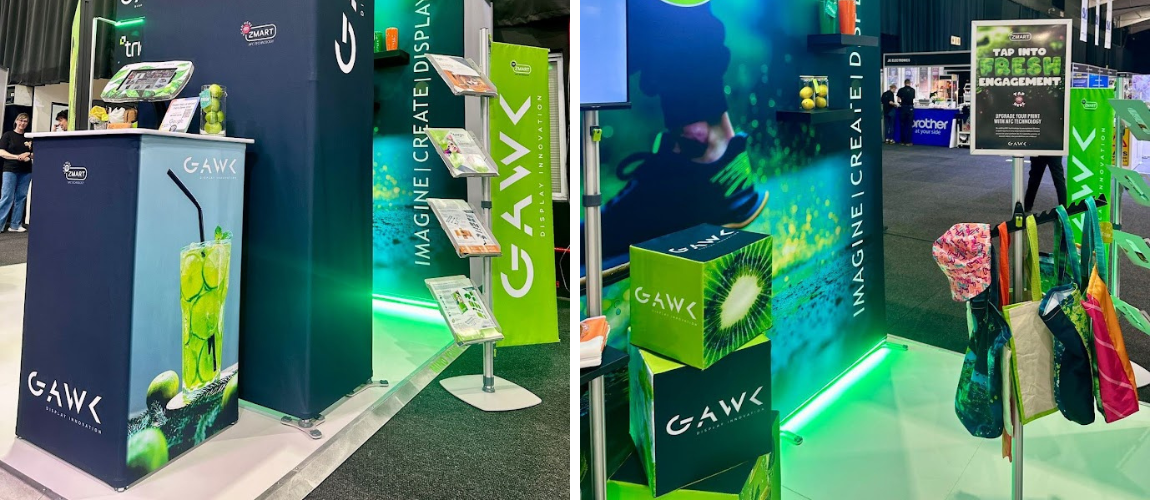
Textile systems are another smart choice. These tensioned fabric panels are lightweight, wrinkle-free, and offer a smooth, sculptural look. They’re also portable, making setup easier. Systems like TRIGA® Displays allow you to swap out graphic sleeves effortlessly, letting you tailor your messaging for different events.
Once you’ve established your visual and sensory elements, the next step is to design a layout that naturally guides visitors through the space.
Planning Layout and Visitor Flow
A well-thought-out layout takes visitors on a seamless journey through your brand’s story – from an inviting entrance to an engaging middle and a strong conclusion. Align your layout with the narrative zones you’ve developed to ensure a cohesive experience. Create specific areas for different purposes: product showcases, interactive demonstrations, or a quiet seating space for in-depth conversations.
Wide walkways and clear sight lines are essential to prevent bottlenecks and direct visitors to key features. If your booth is in a corner, an “L” shaped layout can maximize visibility from multiple angles.
Balancing active zones, like demos or digital displays, with quieter spaces helps manage the energy of your visitors. This is especially important given that 91% of consumers are more likely to engage with brands offering personalized experiences. Thoughtful zoning ensures you cater to a variety of preferences.
Before finalizing your lighting setup, map out your panels and pathways to ensure your key areas are well-lit without overwhelming the space. Testing under conditions similar to the event venue helps you fine-tune brightness, angles, and spacing for the best results.
Modular systems like TRIGA GO and TRIGA MAX offer flexibility for different booth sizes and layouts. TRIGA GO works well for smaller setups, while TRIGA MAX is ideal for larger, modular booths. Both options let you reconfigure your display for various events, saving time and resources.
Using Technology in Your Display
Digital tools can turn textile displays into interactive, immersive experiences. The trick lies in selecting technology that complements your brand story without making things overly complex for visitors – or your team.
Projection Mapping and AR/VR
Projection mapping is a game-changer for textile displays. Instead of relying on bulky LED screens, you can project videos and light directly onto fabric surfaces. This approach often costs less per pixel, especially for large or curved areas.
Marty Fornelli, an AV Engineer at Diversified, describes it perfectly:
“Projection mapping is a storytelling technique that adds extra dimensions to physical spaces and turns passive viewers into active participants.”
One standout example is the Museum of Art + Light (MoA+L). They use projection mapping to create walkable scenes like “rain-drenched London streets” or “Parisian boulevards”. Another great example is TELUS Health in Calgary, where curved projections of underwater scenes and northern lights transform MRI rooms into calming spaces for patients.
For seamless results, use computer models to simulate projector placement, and apply edge blending and warping to align visuals on curved textile frames. In busy settings, camera-based calibration systems can automatically realign content if the display shifts.
Textile displays are also ideal for hybrid events. Their matte finish reduces glare, making them a professional backdrop for livestreams and broadcasts. You can even create special “virtual corners” for live interviews, podcasting, or remote Q&A sessions. Pairing backlit SEG panels with tablets or screens can add another layer to your tech-savvy exhibit.
To take it a step further, integrate QR codes to connect your physical setup with digital content.
QR Codes and Digital Content
QR codes are a simple but powerful way to link your textile display to digital experiences. Print them directly onto the fabric to provide easy access to product demos, testimonial videos, or app downloads. By 2026, it’s estimated that 102 million Americans will scan QR codes. Plus, 78% of consumers say they enjoy using QR codes for ordering.
When using QR codes, keep it straightforward. Assign each code a single call-to-action like “Download App” or “View Menu” to avoid confusing users. Short URLs work best; overly complex codes can be harder to scan, especially on older devices. Dynamic QR codes are a smart choice for marketing campaigns since they allow you to update the destination URL without reprinting and provide valuable tracking metrics like scan counts and device types.
| Error Correction Level | Recovery Capacity | Best Use Case |
|---|---|---|
| L (Low) | ~7% | Clean, digital displays or high-quality print |
| M (Medium) | ~15% | Flyers, brochures, and general marketing materials |
| Q (Quartile) | ~25% | Situations with minor wear or damage |
| H (High) | ~30% | Outdoor signage, industrial use, or branded codes with logos |
Placement matters. Position QR codes at eye level and avoid tricky spots like corners, folds, or glossy surfaces that might cause glare. Always include a clear call-to-action, like “Scan to view the menu” or “Scan for 10% off.” As Delivr notes, “A QR code on its own is not a call-to-action”. For larger displays, such as banners, size the code appropriately for scanning from a distance. A minimum size of 1×1 inch works well for close-range use.
Lastly, ensure your landing page is mobile-friendly and loads quickly. TribLIVE puts it bluntly: “Your QR code might direct users to a website, app, or video, but it’s a dealbreaker if that content isn’t mobile-friendly”. Test the codes across multiple devices (both iOS and Android) and under different lighting conditions to ensure smooth functionality.
Selecting Portable Display Systems
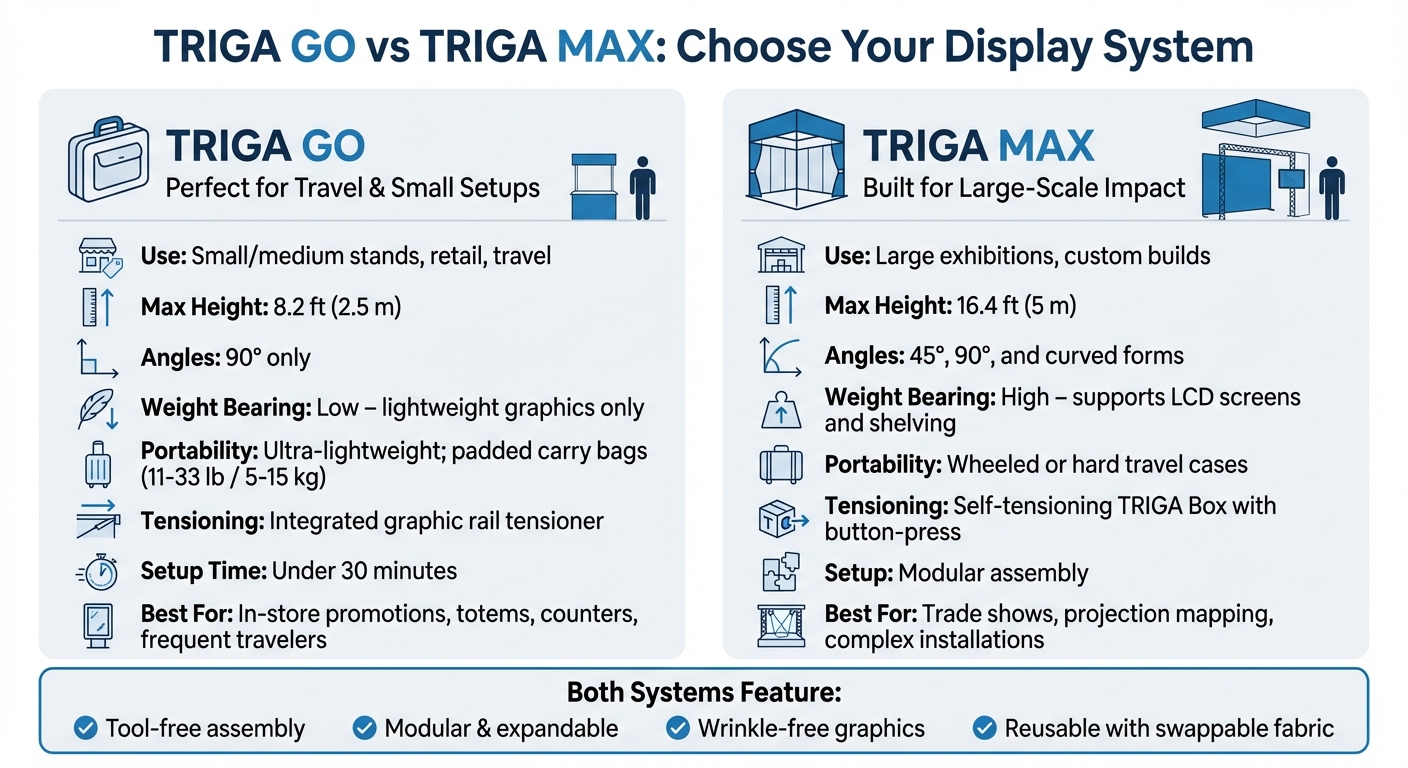
TRIGA GO vs TRIGA MAX Display Systems Comparison
Once your digital elements are ready, the next step is to choose a physical display system that aligns with your brand’s story and creates an immersive experience.
The ideal portable display system strikes a balance between ease of transport, visual appeal, and structural strength – all without needing a professional crew for setup.
Think about scale: Most standard systems are designed for setups up to 8.2 ft (2.5 m), but larger installations may require systems that reach up to 16.4 ft (5 m). Weight capacity is another critical factor. If your display needs to support heavy equipment like LCD screens or shelving, look for systems specifically built for this purpose. Some are only suitable for lightweight graphics.
Design geometry also plays a big role in creating an engaging environment. While simple 90° corners work for straightforward layouts, more dynamic shapes – like curved walls or 45° angles – can enhance storytelling by drawing visitors into the space. For professionals on the go, lightweight systems designed for carry-on convenience are ideal, while larger setups may benefit from systems that come with wheeled travel cases.
To keep things efficient, opt for tool-free, modular frames that can be assembled in under 30 minutes. Systems with patented tensioning technology ensure graphics stay wrinkle-free and seamlessly integrated, which enhances the overall immersive effect. These features not only make your display visually appealing but also ensure it functions as a key component of your brand’s narrative.
With these factors in mind, let’s take a closer look at two specific solutions: TRIGA GO and TRIGA MAX.
TRIGA GO vs TRIGA MAX: Features and Benefits
TRIGA® Displays offers two systems tailored to different needs: TRIGA GO and TRIGA MAX. Both feature modular, tool-free aluminum frames and patented tensioning technology for flawless, wrinkle-free graphics.
TRIGA GO, launched in 2019 after three years of development, is perfect for professionals who travel frequently. It’s lightweight, with components that pack into padded bags weighing just 11–33 lb (5–15 kg). Setup takes under 30 minutes, and it’s designed for displays up to 8.2 ft (2.5 m) in height with 90° angles. This makes it ideal for smaller activations like in-store promotions, totems, and counters. However, it’s not built to handle heavy accessories like LCD screens.
“TRIGA® Go’s unique and innovative design makes it the perfect exhibition / show stand for professionals with a busy travel schedule.” – TRIGA® Displays
TRIGA MAX, introduced in 2006, is designed for larger, more complex installations. It supports heights of up to 16.4 ft (5 m) and accommodates 45° angles, 90° corners, and curved designs. Its “self-tensioning” TRIGA Box uses a button-press mechanism to ensure perfect fabric tension. TRIGA MAX can also handle heavier accessories like LCD screens and shelving. While its components are less portable than TRIGA GO – packing into wheeled or hard cases – it offers the flexibility needed for ambitious, large-scale brand displays.
| Feature | TRIGA GO | TRIGA MAX |
|---|---|---|
| Use | Small/medium stands, retail, travel | Large exhibitions, custom builds |
| Max Height | 8.2 ft (2.5 m) | 16.4 ft (5 m) |
| Angles | 90° only | 45°, 90°, and curved forms |
| Weight Bearing | Low – for lightweight graphics | High – supports LCD screens and shelving |
| Portability | Ultra-lightweight; fits in padded carry bags | Packs into wheeled or hard travel cases |
| Tensioning | Integrated graphic rail tensioner | Self-tensioning TRIGA Box with button-press activation |
| Setup | Assembly in under 30 minutes | Modular |
Both systems are modular, so you can start with a basic setup and expand it into more complex configurations, like L-shaped or U-shaped booths, by adding components. They’re also reusable – simply swap out the fabric graphics for new campaigns, making them a sustainable option.
Choose TRIGA GO for situations where portability and simplicity are key. For larger setups requiring advanced features like projection mapping or the integration of digital screens, TRIGA MAX is the better choice.
sbb-itb-b68070b
How to Set Up Your Display
Planning Your Display
Before your event, it’s crucial to plan the layout of your display, including geometry, walkways, and focal points. This helps you create a setup that encourages smooth visitor flow and maximizes engagement opportunities. Decide which panels will serve as backdrops, where counters or totems will go, and the placement of digital elements like screens or QR codes. This preparation prevents last-minute scrambling and gives you a clear vision of how attendees will interact with your space.
Pay attention to the lighting as well. Position lights to avoid glare and highlight key areas. For vibrant and accurate fabric colors, use lighting with a Color Rendering Index (CRI) of 90 or higher. The color temperature also matters: 2700K offers a warm and welcoming vibe, while 5000K gives a sleek and modern look. Don’t forget to plan for cable management and power needs early on to avoid messy setups or safety hazards.
Installation and Testing
Once your planning is complete, you can move into the setup phase. Most modular textile displays are designed for quick assembly, often taking less than 30 minutes. Start by unpacking and sorting the main components – uprights, crossbars, feet, and graphic rails. With TRIGA’s tool-free “slot and snap” system, assembly is straightforward: connect the feet to the uprights, attach the crossbars to form the frame, and finish with graphic rails and any additional accessories.
After building the frame, the final step is to activate the tensioning devices. For TRIGA MAX, press the button on the tensioning box, while TRIGA GO requires pressing down on the tensioner to lock the fabric in place. This patented technology ensures the fabric is pulled tight, eliminating wrinkles for a polished, professional look. If you notice any issues with the graphics – like damage or incorrect prints – TRIGA systems allow you to replace fabric skins in seconds without needing to take apart the entire frame.
Before the event starts, it’s essential to test all elements in conditions similar to the venue. Make sure digital features, such as QR codes and mounted screens, work without a hitch. Adjust the lighting to avoid glare or hotspots on the fabric, and use side or low-angle lighting to enhance the texture and depth of the material. Double-check that all power cables are safely routed through recessed profiles or hidden storage areas. It’s also smart to have backup power options, like portable LED units or battery packs, on hand.
With everything tested and securely in place, your display will be ready to capture attention and leave a lasting impression.
Measuring Results and Making Improvements
Tracking Performance Metrics
Once your immersive display is set up, the next step is to measure its effectiveness. Tools like heat mapping, RFID tracking, and Wi-Fi sensors can help you monitor key metrics such as dwell time and interaction rates. For example, if visitors spend more time in the lounge area but avoid product demos, it might be time to rethink your layout and adjust underperforming zones.
Focus on lead quality, not just quantity. Group leads based on their interaction levels and track how many complete demonstrations, giving you a better picture of actual engagement. After the event, measure the total value of new opportunities added to your sales funnel. Forrester reports that 36% of marketers cite “Increased ROI” as the primary benefit of integrating digital elements into their events.
Social media metrics can offer another layer of insight. With 98% of consumers generating digital or social content during brand experiences, monitoring mentions, shares, and hashtag usage can reveal how well your message is resonating online. Sentiment analysis tools, combined with post-event surveys and social feedback, can help you gauge emotional reactions to your display. Additionally, debriefing booth staff immediately after the event can provide qualitative insights, such as common questions or visitor reactions, that raw data might overlook.
These data points are essential for fine-tuning future displays.
Improving Future Displays
The insights you gather after an event are your roadmap for making improvements. For instance, one CES exhibitor noticed high traffic but low conversions. By repositioning their demo zones, they boosted lead quality by 38% and increased closed deals by 21% within just 60 days.
Use tools like heat mapping and dwell time data to identify areas that didn’t perform as expected. For example, if a costly display wall generated fewer qualified leads than a simple interactive game, consider redirecting your budget toward more engaging, interactive elements for the next event. Comparing feedback and engagement data from current and past events can help you identify long-term trends. You might also experiment with A/B testing different booth layouts or messaging at separate events to find the most effective setup.
“The real ROI doesn’t just come from what happens during the event; it comes from what you learn afterward.” – KSM Exhibits
Conclusion
Immersive displays are changing the way audiences connect with brands. By crafting a compelling narrative, incorporating multisensory elements, and using technology in meaningful ways, you can create experiences that leave a lasting impression. Research shows that immersive exhibitions can increase brand recall by up to 70% and influence purchase intent for 91% of consumers. And with 86% of consumers emphasizing authenticity as a key factor in their buying decisions, it’s clear that your display needs to reflect your brand’s values, not just feature its logo. Whether you’re hosting tech demonstrations, retail pop-ups, or nonprofit events, the formula remains consistent: design for smooth visitor interaction, engage multiple senses, and focus on measurable outcomes.
To bring these strategies to life, TRIGA® Displays offers solutions that are both practical and captivating. Their portable, modular systems allow you to adapt displays effortlessly for different events. With tool-free assembly and interchangeable graphic sleeves, you can refresh your messaging without overhauling your entire setup. Plus, TRIGA® GO can be assembled in under 30 minutes, freeing up your team to focus on meaningful visitor engagement rather than complex installations.
For maximum impact, use high CRI lighting (90+) to ensure your textile graphics pop, create distinct zones to guide visitors through your story, and track key metrics to continuously improve your approach. When executed well, an immersive display transforms into a powerful brand experience that delivers tangible results.
FAQs
How do I turn my brand story into a simple booth layout?
To design a booth layout that effectively shares your brand story, aim for a clean and visually appealing setup that emphasizes your core message. Consider using modular systems such as TRIGA®’s lightweight, tensioned displays for a polished and flexible presentation. Divide your booth into distinct areas – such as a welcoming space, a storytelling section, and a call-to-action zone. Incorporate visual elements like banners and digital screens to convey your story clearly, making sure to keep the space uncluttered for maximum impact.
What’s the easiest tech to add without overwhelming visitors?
A modular display system like TRIGA® Go offers a straightforward and user-friendly way to showcase your brand without overwhelming your audience. Its tool-free, quick-assembly design ensures a clean, wrinkle-free appearance every time. Thanks to its lightweight and portable nature, exhibitors can easily set up and rearrange textile graphics, making it perfect for crafting engaging brand storytelling displays while keeping the setup process hassle-free.
How can I measure ROI from an immersive display?
To accurately measure ROI from an immersive display, start by defining clear objectives. Are you aiming for lead generation, boosting brand awareness, or increasing visitor engagement? Once your goals are set, track relevant metrics like:
- Leads collected: How many potential customers engaged with your display and provided their information?
- Visitor interactions: Monitor how people interact with the display – this could include time spent, actions taken, or questions asked.
- Brand recognition: Assess whether your display improved awareness or recall of your brand.
Beyond initial metrics, take a closer look at the quality of interactions. Are the leads converting into customers? Are visitors engaging in meaningful ways that align with your goals? These follow-up insights can reveal the long-term value of your immersive display and whether it’s effectively advancing your marketing strategy.