



7 Tips for Transporting Exhibition Displays Safely
Transporting your exhibition displays without damage requires careful planning and execution. Most damage occurs during teardown, packing, and shipping – not at the event itself. Improper handling can lead to costly repairs or replacements, but with the right strategies, you can keep your displays in excellent condition for years. Here’s a quick summary of the key tips:
- Roll Fabric Graphics Properly: Always roll with the printed side out using a 3–4 inch core, and wrap in protective material to avoid creases or ink transfer.
- Invest in Durable Cases: Hard-shell cases with wheels, foam inserts, and clear labels protect your materials during rough handling.
- Disassemble in Reverse Order: Carefully dismantle components, group them by function, and label everything for easy reassembly.
- Palletize for Freight Shipping: Consolidate items on a pallet to reduce handling risks and save on shipping costs.
- Plan Shipping in Advance: Use advance warehouses and book trade show carriers early to meet strict delivery windows.
- Pack Electronics Separately: Use padded cases for fragile components like screens and lights, and organize small parts in labeled bags.
- Streamline On-Site Repacking: Photograph setups, follow a consistent packing order, and inspect for damage to prepare for the next event.
Proper packing and transport can extend the life of your displays to 20–40 shows, saving you time and money. A standardized process ensures smooth setups and protects your investment.
1. Use the Right Packing Materials to Protect Graphics
When it comes to stretch fabric displays, rolling is the way to go. Folding might seem convenient, but it often leads to stubborn creases that require steaming – and even then, the results can be hit or miss. Rolling your displays keeps the material smooth and ready for repeated use without the hassle.
Here’s how to do it right: always roll with the printed side facing out. Why? The ink layer is more flexible than the backing, so this method helps prevent compression marks and keeps colors vibrant. For Silicone Edge Graphics (SEG), make sure the silicone edge is on the outside to avoid any risk of warping.
Choose a 3–4 inch rolling core for the best results. A thinner core can cause creases, while a thicker one wastes space. Cardboard mailing tubes are a solid option for most uses, but if you’re shipping via heavy-duty freight, consider capped PVC pipes for added durability.
Once rolled, take an extra step to protect your graphic. Wrap it in acid-free tissue paper or a poly sheet, then place it in a soft fabric sleeve or a plastic garment bag. This double layer helps prevent ink transfer, dust, and scratches. Avoid using newspaper (its ink can bleed) or trash bags (they trap moisture and cause static).
“Rolling fabric around a core is non-negotiable.” – PrintDrill
Before packing, make sure the fabric is completely dry. Rolling damp material can lead to mold or unpleasant odors. If you’re shipping long distances or through areas with varying humidity, toss in some silica gel packs to absorb moisture during transit. Properly packed fabric graphics can hold up for 2 to 4 years – or about 20 to 40 shows. A little extra effort now can save you a lot of trouble down the road.
sbb-itb-b68070b
2. Use Durable Cases and Label Them Clearly
Once you’ve rolled your graphics for protection, the next step is ensuring they stay safe during transport. This is where durable cases come into play. Shipping can be rough – think stacked freight, bumpy loading docks, and careless handling. A sturdy case acts as a buffer, as Orbus Displays aptly describes:
“A good case takes the blow of bad handling, bumpy roads, or a klutzy airport staff. A shield for your display.”
For portable textile displays, hard-shell cases made of ABS or HDPE plastic are your best bet. These materials spread out the impact, reducing the risk of damage to your display. Investing in one of these cases, which typically costs $150–$300, is far cheaper than paying $200–$700 to replace damaged panels or hardware.
Look for cases with built-in wheels and telescoping handles to make solo transport easier – especially when navigating the long hallways of convention centers. Custom foam inserts are another must-have, as they keep your components secure and prevent scratches on your panels. If you’re flying, choose lightweight ABS composite cases to avoid exceeding baggage weight limits or paying hefty freight fees.
Proper labeling is another crucial step that many exhibitors overlook. Clear, durable labels can save you from setup headaches and prevent missing-piece disasters. Each case should include the following details: booth number, company name, contact phone number, and case count (e.g., “Case 3 of 5”). Use waterproof labels to ensure they hold up against rain, humidity, and other tough conditions. For larger setups with multiple booths, color-coded tape can make sorting cases much faster.
Here’s a pro tip: add an extra label and a copy of your setup instructions inside each case. External labels can tear or fall off, but an internal backup ensures your team knows what’s inside and how to assemble it – even if it’s their first time handling your display.
3. Disassemble and Bundle Hardware in Order
Protecting your display starts with how you take it apart. The way you disassemble your booth can make or break the ease of your next setup while also safeguarding your components from unnecessary damage. A methodical, reverse-order teardown is key to keeping everything intact and ready for reuse.
The best strategy? Work backward from how you originally assembled the display. Begin by removing accessories like literature racks and tablets. Next, take off the fabric sleeve, disconnect all power and lighting, and finally, dismantle the frame. This order ensures you handle the most fragile elements first. For instance, separating frame poles while the fabric skin is still attached can easily snag or tear your graphics – an expensive mistake.
“Most booth damage doesn’t happen on the show floor. It happens during teardown, packing, and transport. Quietly. Repeatedly. And usually because someone was tired, rushed, or thought, ‘It’ll be fine.'” – PrintDrill
By sticking to a careful disassembly process, you reduce the risk of damage without needing to add extra padding or precautions.
Once everything is disassembled, group components by their function for a smooth reassembly later. Keep poles, connectors, and feet from the same section together and label them clearly, such as “Backwall Left Pole” or “Counter Feet – Set A.” Small items like screws, pins, and connectors should go into labeled zip bags, which you can attach to their corresponding frame parts. As PrintDrill points out, “Loose parts are the silent killer.”
When packing, keep poles straight and parallel to avoid bending or creating pressure points. Use foam pipe insulation or bubble wrap between metal pieces to prevent scratches, especially on anodized coatings. Inside the case, place heavier items like base plates at the bottom and lighter frame poles on top, ensuring delicate graphics remain unharmed.
Lastly, document the teardown process. Snap photos or record a quick video of your team breaking down the booth. This visual guide will make setting up next time much easier. As TRIGA® Displays wisely advises, “The better the teardown, the easier the next setup.”
4. Palletize and Secure Loads for Freight Transport
After proper packing and labeling, the next crucial step is consolidating your shipment. Shipping individual boxes increases the risk of loss and damage, whereas combining them into a single, secure pallet significantly reduces these risks. A lot of this comes down to how well the load is consolidated before it even leaves the dock.
Shrink-wrapping all your boxes and cases onto a single skid transforms scattered items into one cohesive unit. This method complements earlier packing efforts, creating a more secure load that minimizes handling risks during transit. This is especially important at convention center docks, where forklifts handle palletized loads instead of manual labor. Fewer “touches” mean fewer opportunities for accidents or misplaced boxes.
“If you shrink-wrap loose items onto a single skid or pallet and ship them as a single unit, you’ll pay the minimum once instead of five times.” – Phoenix Logistics
This quote highlights a key cost-saving measure: drayage fees. These fees are calculated per shipment based on a minimum weight. For example, shipping five 30-lb boxes separately means paying the minimum fee five times. But if you combine them into a single 150-lb pallet, you only pay that fee once.
When assembling your pallet, start with heavier, sturdier items at the bottom and place lighter, more fragile items on top. This keeps the center of gravity low and helps prevent shifting during transport. Add corner guards to protect vulnerable edges, and make sure to label at least two sides of the pallet so forklift operators can easily identify it, no matter how it’s positioned. Using brightly colored shrink wrap or distinctive tape can also make your pallet stand out on a busy loading dock.
Finally, take a timestamped photo of your completed pallet. This simple step can be invaluable if you need to file a damage claim later. Proper palletizing not only protects your shipment but also sets the stage for smoother trade show logistics with fewer handling risks.
5. Plan Trade Show Shipping and Scheduling in Advance
Once your materials are securely palletized, timing takes center stage. Trade show venues enforce strict target move dates – specific windows when they’ll accept freight. Miss that window, and your shipment could be turned away entirely. Unlike standard deliveries, there’s no option to reschedule once the show has started. Proper scheduling ensures your carefully packed materials arrive on time.
As Freightzy puts it:
“Trade show shipping is one of the most unforgiving types of freight movement. Unlike standard commercial deliveries… a missed trade show delivery means your booth does not make it to the show floor. There is no second attempt.”
One of the best ways to avoid this nightmare is by using an advance warehouse. Instead of sending your shipment directly to the venue, ship it to a storage facility 14–21 days ahead of the event. These facilities deliver your materials to your booth space before you even arrive. While storage fees may add to your budget, Freightzy emphasizes that “the cost of storage is insurance against the cost of missing the show.”
Start planning your logistics 60–90 days before the event. This is when you should confirm your booth space and book a freight carrier with expertise in trade shows. Carriers with trade show experience understand venue rules, marshalling yard processes, and docking limitations – details that generic carriers might overlook. Keep in mind that as the event date approaches, finding an available carrier becomes increasingly difficult.
Finally, don’t leave your outbound shipment to chance. Before the show begins, prepare your return Bills of Lading and print return labels during your setup. This proactive step can help you avoid last-minute stress and unnecessary premium charges during teardown.
6. Pack Electronics, Accessories, and Lighting Separately
Once your fabric panels and frame are secured, turn your attention to the more fragile components – electronics and accessories. While the frame and fabric panels can withstand some rough handling, items like LED screens, lighting fixtures, and power cables are far less forgiving. Surprisingly, more than 60% of trade show booth damage claims stem from packing mistakes, not shipping mishaps.
The fix? Keep everything organized by category, with each type of component in its own container. For monitors and LED screens, use hard-shell or ATA flight cases lined with shock-absorbing foam. Wrap sensitive circuitry in anti-static bubble wrap to avoid electrostatic discharge. For smaller accessories, like connectors or screws, opt for labeled zip bags or divided plastic organizers to keep things tidy and easy to find.
Lighting components need extra care, too. Wrapping light fixtures with booth fabric can lead to ink smudges, fabric damage, or even scratched lenses. Instead, store them in dedicated padded pouches, and make sure the lights have fully cooled before packing. Packing warm fixtures can trap moisture, which might harm the lights or other items in the case.
Even the smallest accessories – like screws, pins, or spare HDMI cables – require thoughtful packing. Tossing them loose into the main crate can result in lost parts or scratched panels. Use labeled zip bags or divided organizers for these items, and consider adding a silica gel pack to electronics cases to control humidity during transit.
“If it can fit in your pocket, it needs a labeled container.” – PrintDrill
Finally, take a quick photo of your wiring and connection setup before disassembling. A simple snapshot on your phone can save you 20–30 minutes of frustration when it’s time to reassemble everything on the show floor.
7. Set Up a Clear Process for On-Site Handling and Repacking
Once your displays have been transported safely, how you handle them on-site plays a huge role in preparing for the next event. Teardown is often where things fall apart. After a long show, the team is exhausted, and items tend to get thrown into cases without much care. But as Hughes Custom Logistics wisely notes:
“In reality, [teardown] is the beginning of your next show’s prep cycle.”
To streamline this process, take a few key steps:
- Photograph the booth before teardown: Snap pictures of the fully assembled display. These photos act as a record of its condition and provide a handy reference for setting it up again.
- Pack smartly: Place items back into cases in reverse order of assembly. This way, the first things you’ll need at the next event are easy to grab. Include a printed checklist and setup diagram inside each case for added clarity.
- Inspect and document: Check for damage during pack-out and again before shipping to the next location. Take note of what worked well and what didn’t. These observations will help you fine-tune your process over time.
Palletized vs. Non-Palletized Shipments: A Side-by-Side Comparison
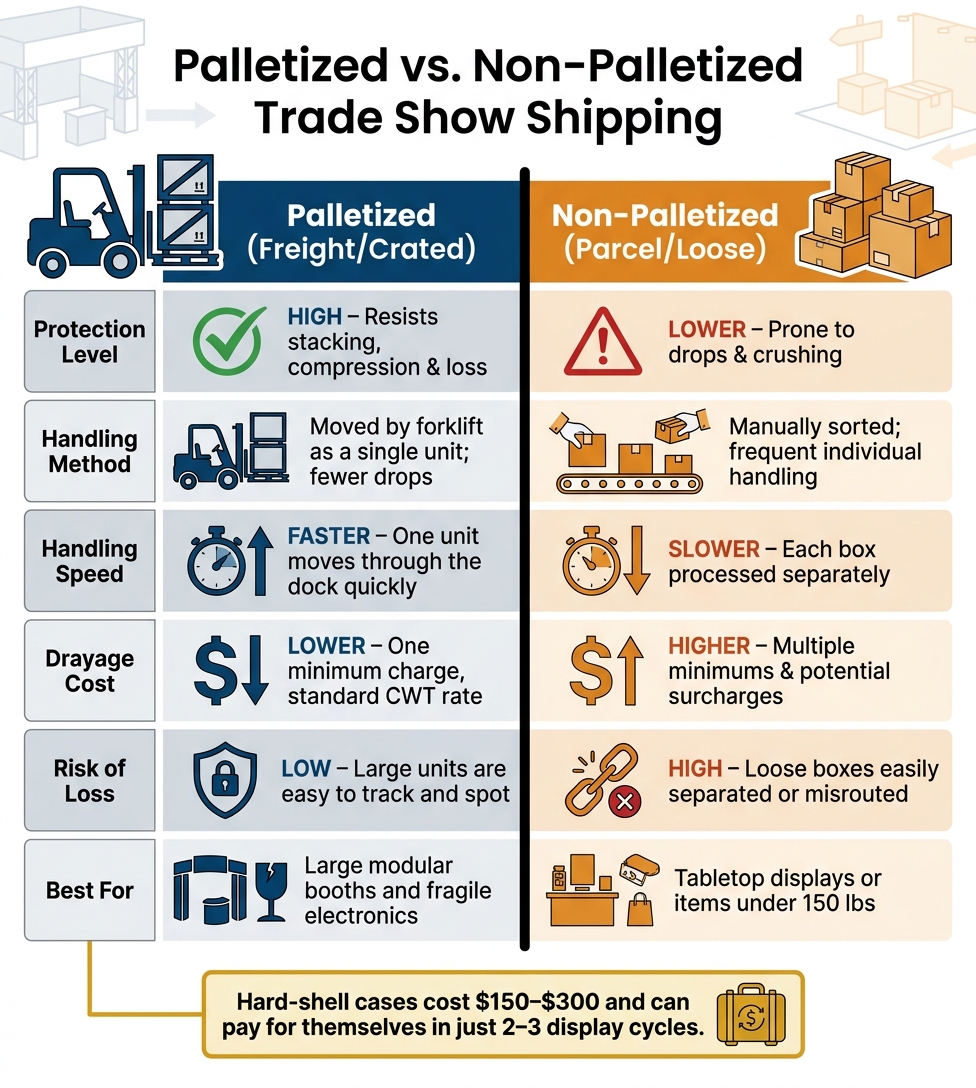
Palletized vs. Non-Palletized Trade Show Shipping: Key Differences
When it comes to secure packing strategies, palletized shipping often stands out for its ability to enhance both protection and cost efficiency. Opting for palletized shipping can safeguard your displays while also improving efficiency during setup. Factors like display size, budget, and shipment volume should guide your decision.
Here’s a quick comparison of palletized and non-palletized shipping across key factors:
| Factor | Palletized (Freight/Crated) | Non-Palletized (Parcel/Loose) |
|---|---|---|
| Protection Level | High; resists stacking, compression, and loss | Lower; prone to drops and crushing |
| Handling Method | Moved by forklift as a single unit; fewer drops | Manually sorted; frequent individual handling |
| Handling Speed | Faster; one unit moves through the dock quickly | Slower; each box is processed separately |
| Drayage Cost | Lower; one minimum charge, standard CWT rate | Higher; multiple minimums and potential surcharges |
| Risk of Loss | Low; large units are easy to track and spot | High; loose boxes are easily separated or misrouted |
| Best For | Large modular booths and fragile electronics | Tabletop displays or items under 150 lbs |
This breakdown highlights how the right shipping method can reduce damage risks and streamline event setup.
One critical tip: avoid using soft-sided carry bags for commercial freight, whether or not you’re palletizing. Starline Displays explains: “A soft-sided bag allows frame tubes to shift during transit, which wears down the anodized surface of aluminum components at the stress points.” Instead, hard-shell cases are the smarter choice whenever forklifts or commercial carriers are involved.
For full booth setups, palletizing is typically the safer and more economical option. Investing in a quality hard case – which usually costs between $150 and $300 – can save you money in the long run by preventing damage. In many cases, this upfront cost pays for itself after just two or three display cycles. This comparison makes it clear: palletizing is a solid choice for effective and reliable trade show logistics.
Conclusion
Transporting your exhibition display safely takes more than just basic precautions – it requires a well-thought-out plan.
The strategies shared here work together seamlessly: rolling fabric graphics on a 3–4 inch core, storing items in hard-shell cases, clearly labeling components by function, fully disassembling hardware, and scheduling shipments with extra time built in. These steps not only reduce the risks of repeated transit but also help your display last longer. When handled and packed properly, fabric graphics can endure 2–4 years or 20–40 shows, offering a strong return on the effort you put into their care.
One of the smartest moves you can make is to standardize your packing process. Develop a consistent order for packing, take photos of your setup before dismantling, and include a packing diagram in each case. This consistency ensures your display stays in excellent shape and makes your setup smooth and efficient. By refining your packing and setup routine, you’ll be ready to deliver a polished presentation at every event while minimizing last-minute issues. Take the time to standardize now and set yourself up for success.
FAQs
Should I ship my booth freight on a pallet or as separate boxes?
When deciding between a pallet and individual boxes, consider both your budget and the size of your display. Shipping everything on a single pallet or crate can often save money on drayage and handling fees, as these charges are usually calculated based on the number of separate items. Freight shipping is a smarter choice if your shipment weighs more than 150 lbs, needs a forklift for moving, or contains rigid parts that are tricky to manage individually.
What’s the safest way to transport monitors, lights, and other electronics?
To ensure safe transport of monitors, lights, and electronics, start by letting all components cool down completely before packing. This step helps prevent moisture buildup inside the equipment. Wrap each item individually using foam or anti-static bubble wrap to provide proper cushioning. For maximum protection against impacts, use hard-shell, foam-lined ATA flight cases. Clearly label all packages as fragile to signal careful handling. If possible, choose custom-fitted cases to minimize shifting and keep items secure during transit, preserving their condition.
How early should I ship my display to avoid missing the venue’s delivery window?
To make sure your shipment arrives on time, plan for it to get to the venue a few days before your scheduled move-in date. If the event offers an advance warehouse option, take advantage of it and ship your materials weeks ahead to give yourself extra breathing room. Be sure to review your exhibitor kit for the exact move-in time for your booth and double-check delivery details with your carrier if you’re shipping directly to the event location.