


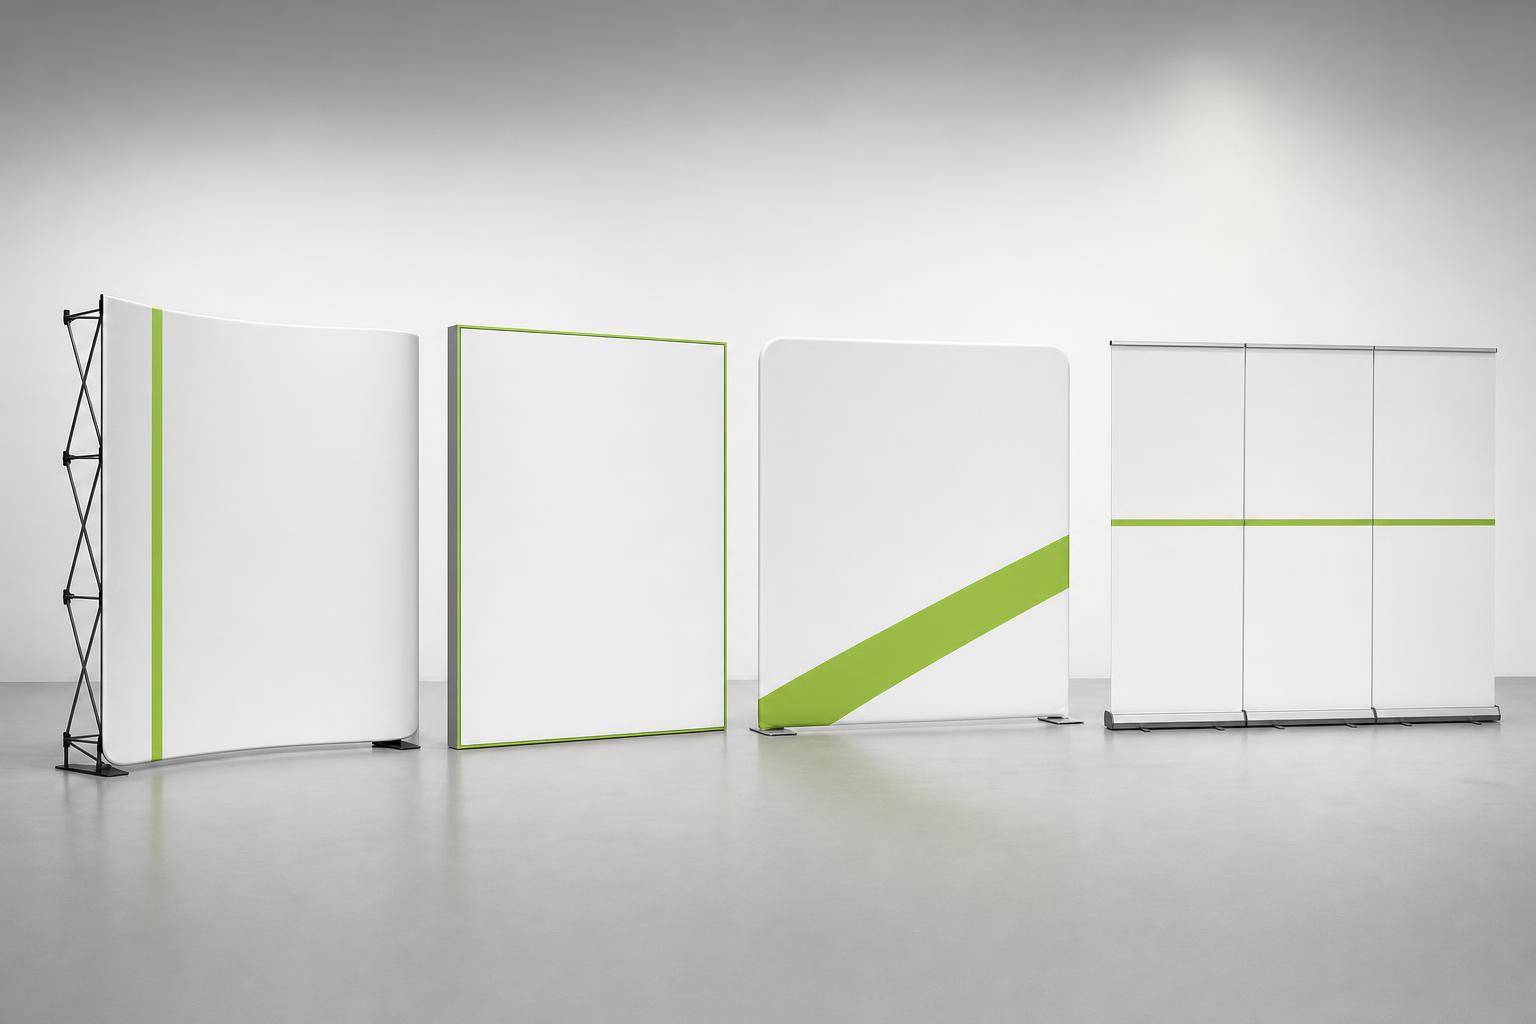
Banner Wall: The Complete Guide to Banner Wall Displays
If I had to boil it down to one point, it’s this: the right banner wall depends on setup time, print look, travel weight, reuse, and venue rules.
If you need a polished main backdrop, I’d look at fabric tension walls or SEG walls. If you want fast setup in under 10 minutes, a pop-up wall is often the better fit. And if your top goal is low cost and split transport, a banner stand wall can work – just know it may look more pieced together.
Before I buy, I’d check these first:
- Booth size: most inline booths are 10′ x 10′ or 10′ x 20′
- Height cap: many inline booths stop at 8′
- Fire code: many U.S. venues ask for NFPA 701 fabric
- Viewing sides: island booths often need double-sided graphics
- Budget: entry systems can start around $150, while fabric wall systems often land around $600 to $1,200 for a first setup
- Reuse plan: reprinting only the graphic can cut long-term cost
A few takeaways stand out. Matte fabric helps cut glare in photo and media settings. SEG graphics give a flat, edge-to-edge look. Pop-up walls are simple for solo setup. Modular systems can change shape for different booth sizes. And in many 10′ x 10′ booths, an 8′ wall is often the better pick because it leaves room for side accessories.
Quick Comparison
| Type | Best For | Setup Time | Travel/Pack | Print Look | Reuse |
|---|---|---|---|---|---|
| SEG / Stretch Fabric Wall | Main booth backdrops, press walls, retail displays | 10–30 min | Bags or wheeled case | Clean, fabric face | High |
| Pop-Up Wall | Fast installs, solo exhibitors, roadshows | Under 10 min | Compact wheeled case | Fabric looks smoother; panels show seams | Medium |
| Banner Stand Wall | Budget events, accent signage, small spaces | Minutes | Separate carry bags | More segmented | Medium |
| Modular Tension Wall | Booths that change size or shape | About 5 min and up | Light to medium, depends on size | Flat fabric face | High |
Bottom line: if I want the best mix of visual polish, portability, and repeat use, I’d usually start with a fabric tension wall. If I need the fastest install, I’d go with a pop-up. If price matters most, I’d use banner stands with the understanding that the final look is less unified.
Here’s the short version of the full guide.
Main Banner Wall Types and Where Each One Fits Best
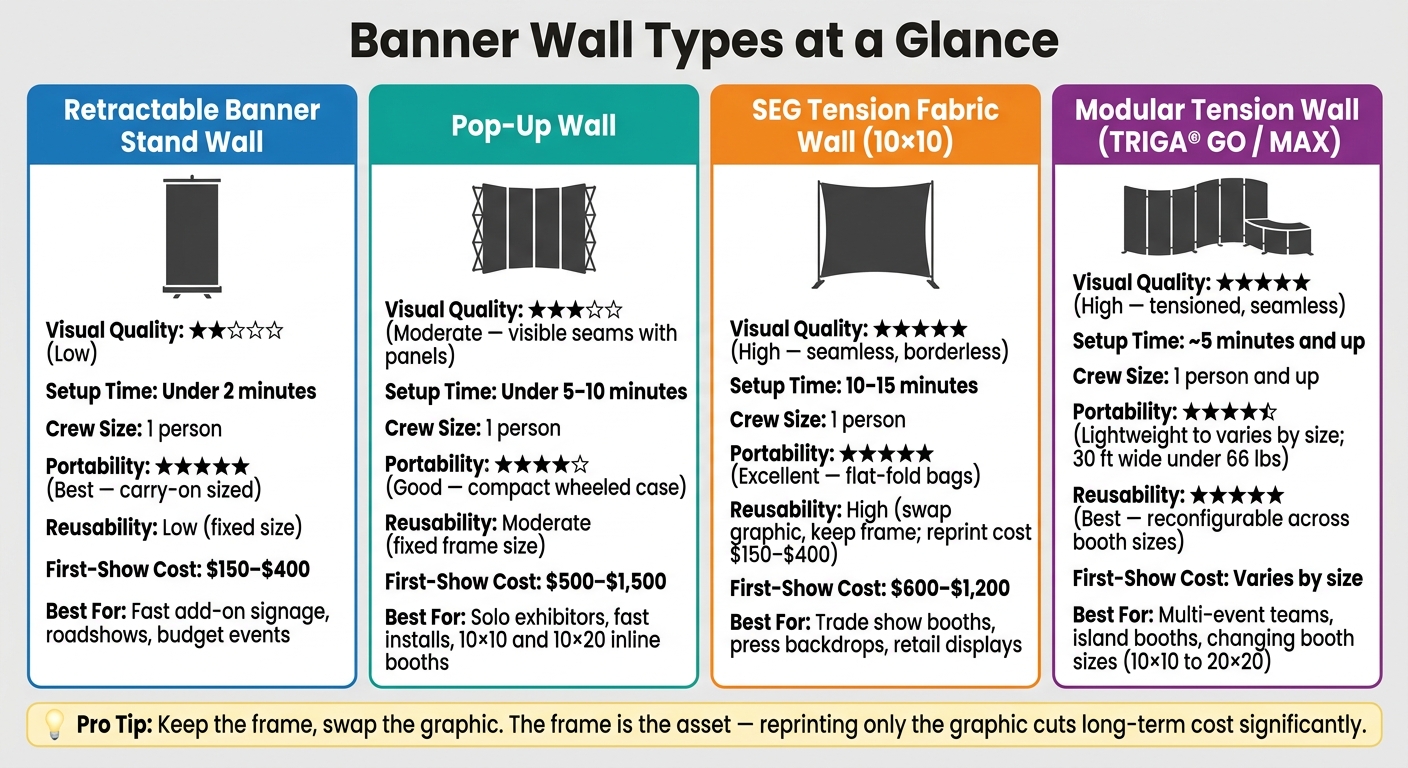
Banner Wall Types Compared: Cost, Setup, Quality & Portability
The right choice comes down to a few simple things: how fast you need setup, how far the display has to travel, how polished the graphic needs to look, and how often you plan to use it again. After you choose the format, the next calls are material, frame style, size, and print finish.
Stretch Fabric and Textile Tensioning Walls
Stretch fabric walls use lightweight aluminum frames with a printed textile graphic. The graphic either slips over the frame like a sleeve or locks into a tension channel, which gives the face a smooth look without visible hardware.
SEG uses a silicone bead sewn into the edge of the graphic and pressed into the frame channel for a flat finish.
If you’re moving from show to show, weight matters a lot. TRIGA® GO keeps that load down. A 9-meter wall at 2.4 meters tall comes in at under 66 lbs., which can help cut freight and drayage costs. TRIGA® MAX is built for curved shapes, including convex and concave layouts, and it can hold mounted LCD screens or shelving. Both systems are modular, so you can use the same hardware in L-shapes, U-shapes, or box formats.
These walls are a strong match for trade show booths, retail feature walls, corporate events, and press backdrops. In inline 10×10 booths, an 8-foot-wide wall often makes more sense than a full 10-foot span because it leaves space for literature racks or banner stands on the sides. In island booths, where the back of the wall faces aisle traffic, double-sided printing is usually the smart move.
| Feature | TRIGA® GO | TRIGA® MAX |
|---|---|---|
| Max Height | Up to 2.5 m (8.2 ft) | Over 2.5 m (8.2 ft) |
| Curved Walls | No (90-degree angles only) | Yes (convex/concave) |
| Weight Bearing | Graphics only | Screens, shelving |
| Best For | Travel-heavy schedules | Large, configurable installs |
Once the format is set, graphic material and edge finish are the next choices.
Pop Up Banner Walls
Pop up walls use a collapsible scissor frame that opens from a compact bundle and locks into place in seconds. A one-piece fabric graphic attaches with Velcro or magnets, and rigid laminated panels can attach to the frame too. Some shipping cases even turn into branded podiums with a graphic wrap and hard top.
Setup usually takes under 10 minutes for a 10-foot wall. That makes pop up systems a smart fit for exhibitors who travel often, set up alone, or need to flip a space fast.
There is one tradeoff. Pop up frames come in fixed sizes, so you can’t rework the hardware for different booth footprints. Rigid panel versions show seams between panels, while fabric versions give you a cleaner, more unified look. These systems work well for 10×10 and 10×20 inline booths, roadshows, and recruiting events.
| Feature | Pop Up Wall | Stretch Fabric Wall |
|---|---|---|
| Setup Speed | Under 10 min | 15–30 min |
| Packed Size | Compact wheeled case | Carry bags or wheeled cases |
| Graphic Replacement | Easy (Velcro/magnets or panels) | Easy (pillowcase or SEG) |
| Modular/Reconfigurable | No | Yes |
| Presentation Quality | High with fabric; seamed with panels | Seamless, premium |
| Frame Durability | Moderate (scissor frame) | High (aluminum frame) |
Next, compare how material and frame structure affect the final presentation.
Portable Banner Stand Wall Systems
A banner stand wall is made of several retractable or telescopic stands placed side by side. Each stand rolls into its own base for transport.
The big draw here is flexibility. You can make the wall larger or smaller by adding or removing stands. Each one travels in a separate carry bag, which makes transport and split shipping simple. You can also pull stands out of the lineup and use them on their own at other locations.
The downside is alignment. Since each stand is separate, the display tends to look segmented instead of seamless. That’s usually fine for secondary signage or booth flanking, but it’s less suited to a wall that’s meant to be the main visual focus. Banner stand walls work best as accent displays, booth entry points, or lower-cost backdrops for small events and recruiting spaces.
| Feature | Banner Stand Wall | Single-Structure Banner Wall |
|---|---|---|
| Flexibility | High (add/remove stands) | Lower |
| Misalignment Risk | Moderate to high | Low |
| Graphic Updates | Per stand | One unified graphic |
| Portability | Individual carry bags | Wheeled case or bags |
| Best Use | Small events, flanking, budget setups | Trade show booths, retail feature walls, corporate events, press backdrops |
The next decision is how frame style, size, and print method change the result.
Materials, Frames, Sizes, and Print Presentation
Graphic Materials and Print Finish Options
Once you lock in the format, the next big call is the material. That choice affects glare, durability, and the way the wall shows up in person.
Fabric is a go-to for indoor booths and press backdrops because the matte surface cuts glare. Scrim vinyl is the other main option. It’s tougher, easy to wipe clean, and a good fit for high-traffic spaces or outdoor use. After that, the frame style and finish shape how clean and polished the wall looks.
Fabric graphics usually use dye-sublimation. That process bonds ink into the fibers, which helps produce sharp color and helps the print resist cracking and peeling. Another plus: fabric graphics can be machine-washed on a gentle, cold cycle and air-dried, which makes it easier to keep them clean from one event to the next.
Finish affects how the graphic attaches and how tight it looks on the frame.
- A pillowcase graphic slides over the frame like a sleeve and zips closed at the base, so setup is fast.
- SEG (Silicone Edge Graphics) uses a silicone strip sewn into the graphic edge that tucks into a channel on the frame. The result is a taut, borderless look with no visible hardware.
SEG works well when the wall needs a more architectural feel or when backlighting is part of the plan. Once attachment style is set, the next step is choosing the frame shape and wall size.
Many U.S. venues require NFPA 701-certified materials, so verify compliance before ordering.
Frame Styles, Wall Sizes, and Single- or Double-Sided Graphics
Straight frames give you a flat, billboard-like surface. They’re a smart fit for text-heavy layouts because there’s no curve to warp type or fine details. Curved frames add depth and tend to feel more welcoming in person, which is why they’re often used for photo ops and main branding moments.
If you need more range, modular systems let you connect straight and curved sections into corners, alcoves, or extra-wide spans up to 30 feet. That’s handy when the same hardware needs to work across different booth sizes or event setups.
Wall size should match both the footprint and the goal. In a standard 10×10 inline booth, an 8-foot wall leaves room for accessories on the sides. A 10-foot wall fills the back of the booth from edge to edge. Larger options like 20 feet and 30 feet make more sense for inline, island, or conference stage backdrops where panoramic brand coverage matters most.
| Size | Best Use Case |
|---|---|
| 8 ft | 10×10 booths with accessories; leaves room for literature racks or banner stands |
| 10 ft | Standard 10×10 inline booth; maximum wall-to-wall visual impact |
| 20 ft | 10×20 inline or island booths; panoramic brand storytelling |
| 30 ft | Large island activations or conference stage backdrops |
Single-sided graphics are the standard choice when the back of the wall faces a neighboring booth or a building wall. Double-sided printing is needed in island or corner setups where people in the aisle can see both sides. These double-sided setups usually include a blockout liner between the two prints to stop light bleed-through.
Aluminum tube frames are lightweight and usually assemble without tools. The graphic is the part you swap out when branding changes, while the frame stays in use as the long-term asset. That means you can reprint the graphic on its own and keep the same hardware in service, which helps narrow down the best wall type for your space, crew, and budget.
How to Choose the Right Banner Wall for Your Event Goal
Match the Display Type to Your Event or Setting
Once you’ve picked the material and frame style, the next step is simple: match the display to the job it needs to do.
Different events ask for different things. A press backdrop, a trade show back wall, and a retail floor display may all look similar at a glance, but they work in very different ways.
For inline trade show booths (10×10 or 10×20), a stretch fabric SEG wall is usually the pro move. The seamless face gives the booth a clean, polished look. And if you’re showing at a crowded event where every aisle is packed, a backlit LED fabric wall can help people spot you from 30–40 feet away. That extra range can matter a lot in those first few seconds, when someone decides to walk past or step in.
Press backdrops and step-and-repeat walls work best with matte fabric. It cuts glare and helps logos show up better in photos. For retail and in-store promotions, easy setup matters more than a top-shelf finish. Store staff often need to assemble and take down the display fast, without special training. For large branded spaces like 20×20 island booths, a modular system such as TRIGA® MAX gives teams room to grow and rearrange the layout without replacing the main hardware.
One rule works in almost every setting: place the logo in the top third of the wall, above head height. That way, it stays visible over staff, counters, and foot traffic no matter which format you use.
Once the use case is clear, the next comparison comes down to cost, setup time, freight weight, and how many times you can use the display again.
Balance Portability, Setup Labor, and Budget
The full cost is more than the price tag on the frame. You also need to think about hardware, freight, drayage, storage, and labor.
A retractable banner stand system usually costs around $150–$400 per unit, and one person can set it up in under two minutes. That’s a good fit for extra signage and roadshows. The trade-off is visual impact. If you line up several retractable stands, the whole setup can make a premium brand feel a bit pieced together.
A stretch fabric SEG wall for a 10×10 booth usually lands around $600–$1,200 for the first show, including hardware and graphics. When the campaign changes, you only need to reprint the fabric graphic, which runs about $150–$400. The aluminum frame stays in use. Over time, that lowers the cost per show in a big way.
TRIGA® GO keeps freight and setup light. A wall that’s about 30 feet wide and 8 feet tall can weigh under 66 lbs., which makes solo setup possible. TRIGA® MAX is built for teams that want to use the same hardware across different booth sizes, like a 10×10 one month and a 20×20 island the next, without buying new frames every time.
The table below puts those trade-offs side by side.
Full Comparison of All Banner Wall Options
| Banner Wall Type | Material | Visual Quality | Portability | Setup Time | Crew Size | Reusability | First-Show Cost |
|---|---|---|---|---|---|---|---|
| Retractable Banner Stand | Vinyl / Fabric | Low | Best (carry-on-sized) | < 2 min | 1 person | Low (fixed size) | $150–$400 |
| Pop-Up Wall | Fabric / Panel | Moderate (visible seams) | Good | < 5 min | 1 person | Moderate | $500–$1,500 |
| SEG Tension Fabric (10×10) | Dye-sub fabric | High (seamless) | Excellent (flat-fold) | 10–15 min | 1 person | High (reprintable) | $600–$1,200 |
| Modular Tension Wall (TRIGA® GO / MAX) | Dye-sub fabric | High (tensioned, seamless) | Lightweight to varies | ~5 min and up | 1 person and up | Best (reconfigurable) | Varies by size |
Use the table to weigh image quality, labor, portability, and reuse against your event goal.
For most event teams, a fabric SEG wall or modular tension wall gives the best mix of strong visuals, easy transport, and long-term reuse.
Conclusion: Choosing the Banner Wall That Fits Your Space, Team, and Brand Goal
Banner walls shape first impressions before your team says a word. After looking at the main formats, the last call usually comes down to four things: visibility, portability, crew size, and budget.
The best format depends on the job. Retractable banners work well for fast, add-on signage. SEG walls make sense when you want a smooth inline booth look. Modular tension walls are a good fit for setups that need to change from one event to the next.
Put simply, your choice comes down to:
- where you’ll display it
- how often you’ll use it
- who will install it
- your budget
One of the biggest ways to save over time is simple: keep the frame and swap the graphic. In that setup, the graphic is the consumable, and the frame is the asset.
Before you place the order, check your venue’s inline height limit and confirm NFPA 701 fabric compliance. Then pick the wall that fits your footprint, your crew, and your brand goal.
FAQs
Which banner wall is best for a 10×10 booth?
The best banner wall for a 10×10 booth comes down to one thing: what matters most to you. Some exhibitors care most about setup time. Others want the cleanest graphic look. And for some, portability is the whole game.
A 10 ft. tension fabric display is light, budget-friendly, and simple to carry from event to event. If your top goal is the fastest setup with a smooth, polished look, a 10 ft. straight pop-up display is often the better fit. Some exhibitors also go with 8 ft. walls so they have a bit more open space for accessories.
How hard is it to replace the graphic later?
Replacing the graphic on a banner wall is simple and low-cost. The aluminum frame is made to last for years, so you can keep the same structure and order only a new fabric print when you rebrand or change your message.
The swap itself is pretty straightforward. Depending on the system, you either unzip a pillowcase-style sleeve or remove a silicone-edge graphic (SEG) from the frame channel.
Do banner wall fabrics need to meet fire codes?
Yes. In the United States, most convention centers and public event venues require booth fabrics and hanging signage to meet NFPA 701.
That standard means the material is flame-retardant. In plain English, it resists ignition and self-extinguishes if it comes into contact with flame.
If you’re using tension fabric displays, checking for NFPA 701 compliance is a must. It helps you meet venue safety rules and avoid setup problems on event day.