
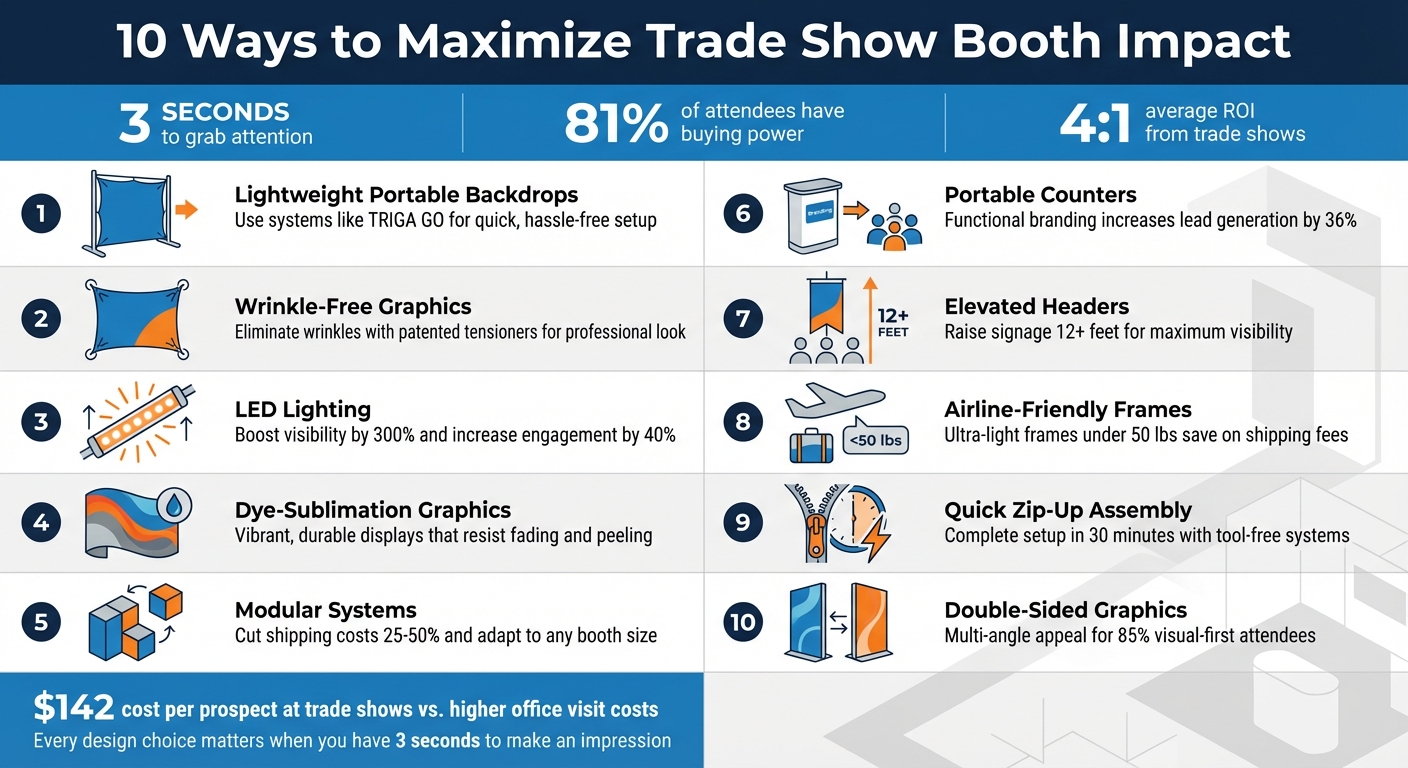
10 Ways to Maximize Trade Show Booth Impact
Trade shows are competitive, fast-paced environments where you have just 3 seconds to grab attention. With 81% of attendees having direct buying power, your booth design can make or break your success. Here’s how to stand out:
- Use lightweight, portable backdrops like TRIGA GO for quick, hassle-free setup.
- Eliminate wrinkles with TRIGA MAX tensioners for a sleek, professional look.
- Add LED lighting to make your booth visually striking and easier to spot.
- Opt for dye-sublimation graphics for vibrant, durable displays.
- Choose modular systems to adjust booth sizes and save costs.
- Incorporate portable counters for functional branding and better engagement.
- Install elevated headers to increase visibility from afar.
- Go airline-friendly with ultra-light frames to cut shipping fees.
- Use quick zip-up assembly systems to save time during setup.
- Leverage double-sided graphics for multi-angle visibility.
Trade shows offer a 4:1 ROI on average, so every design choice matters. From wrinkle-free visuals to modular setups, these strategies ensure your booth draws attention and leaves a lasting impression.
10 Trade Show Booth Design Strategies to Maximize Impact and ROI
Booth Design Ideas That Win On The Trade Show Floor
sbb-itb-b68070b
1. Use TRIGA GO for Lightweight, Portable Backdrops
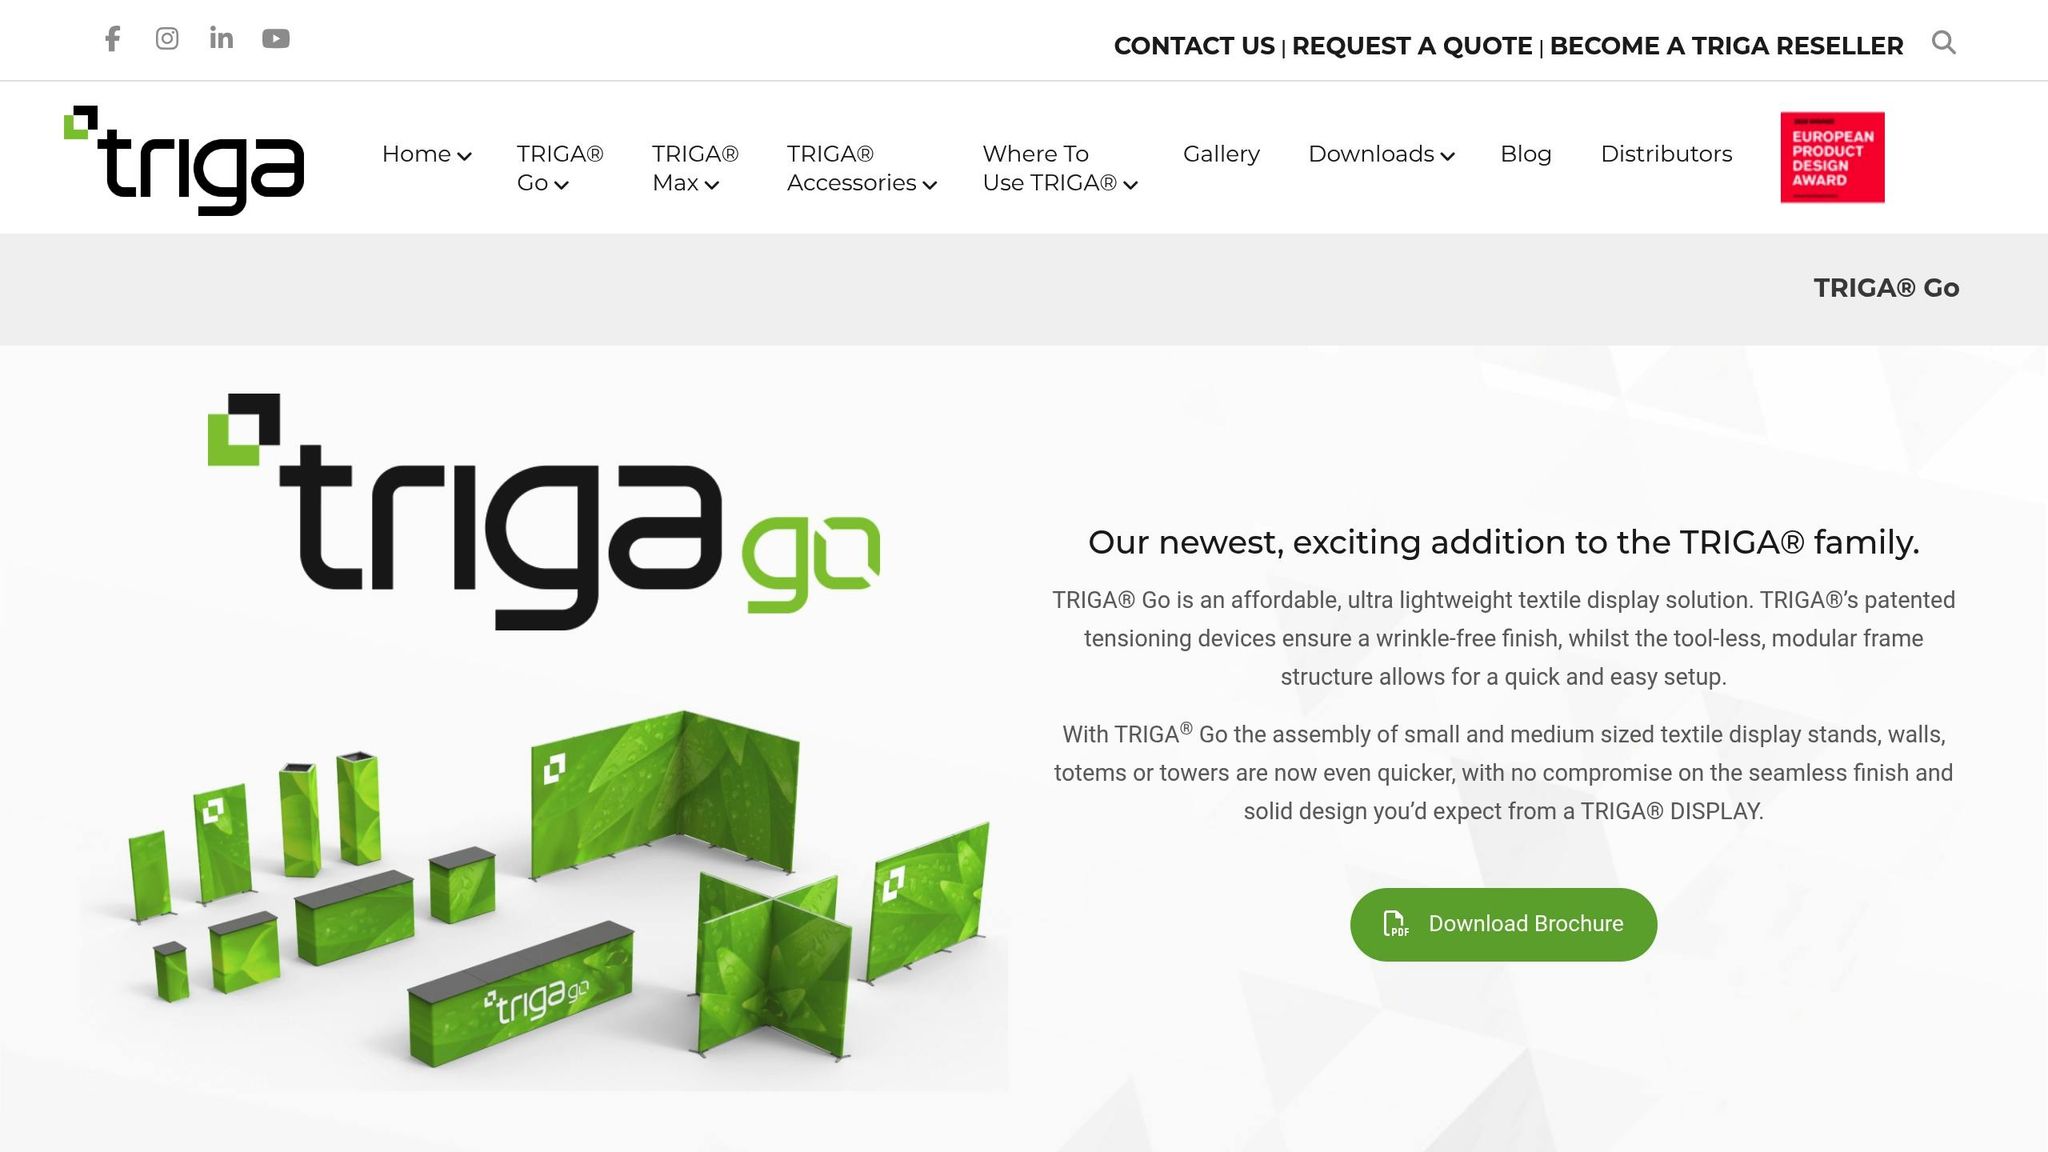
Hauling heavy equipment can be exhausting and time-consuming, especially before an event even begins. That’s where TRIGA GO comes in. This ultra-lightweight frame system delivers professional-quality branding without the hassle. With its tool-free assembly, the uprights, crossbars, and feet snap together effortlessly, saving you time and energy [5].
The standout feature? TRIGA GO’s patented self-tensioning device. Once the frame is set up, a single press locks your graphics in place, leaving them wrinkle-free and ready to impress – all in under 30 minutes. Need to update your messaging? No problem. Graphics can be swapped out in seconds by releasing the tensioner, so you don’t have to buy new hardware for every event [5].
“TRIGA® Go’s modular components make it easy to adapt your display for any event space or branding need.” – TRIGA Displays USA [5]
The system’s compact and lightweight design helps reduce drayage fees, and in many cases, it’s small enough to be transported as checked luggage [5]. Its modular setup works with a variety of booth layouts, whether you’re using standard 10×10 or 10×20 configurations, or creating custom shapes like an “L” to optimize traffic flow [5] [6].
Want to take your booth to the next level? You can attach accessories like LED lighting, shelving, or digital screens directly to the frame, tailoring your display to meet specific engagement goals [5]. TRIGA GO’s flexibility and ease of use make it an ideal choice for creating a polished, professional booth setup. Stay tuned for how advanced graphic tensioning can elevate your display even further.
2. Implement TRIGA MAX Patented Tensioner for Wrinkle-Free Graphics
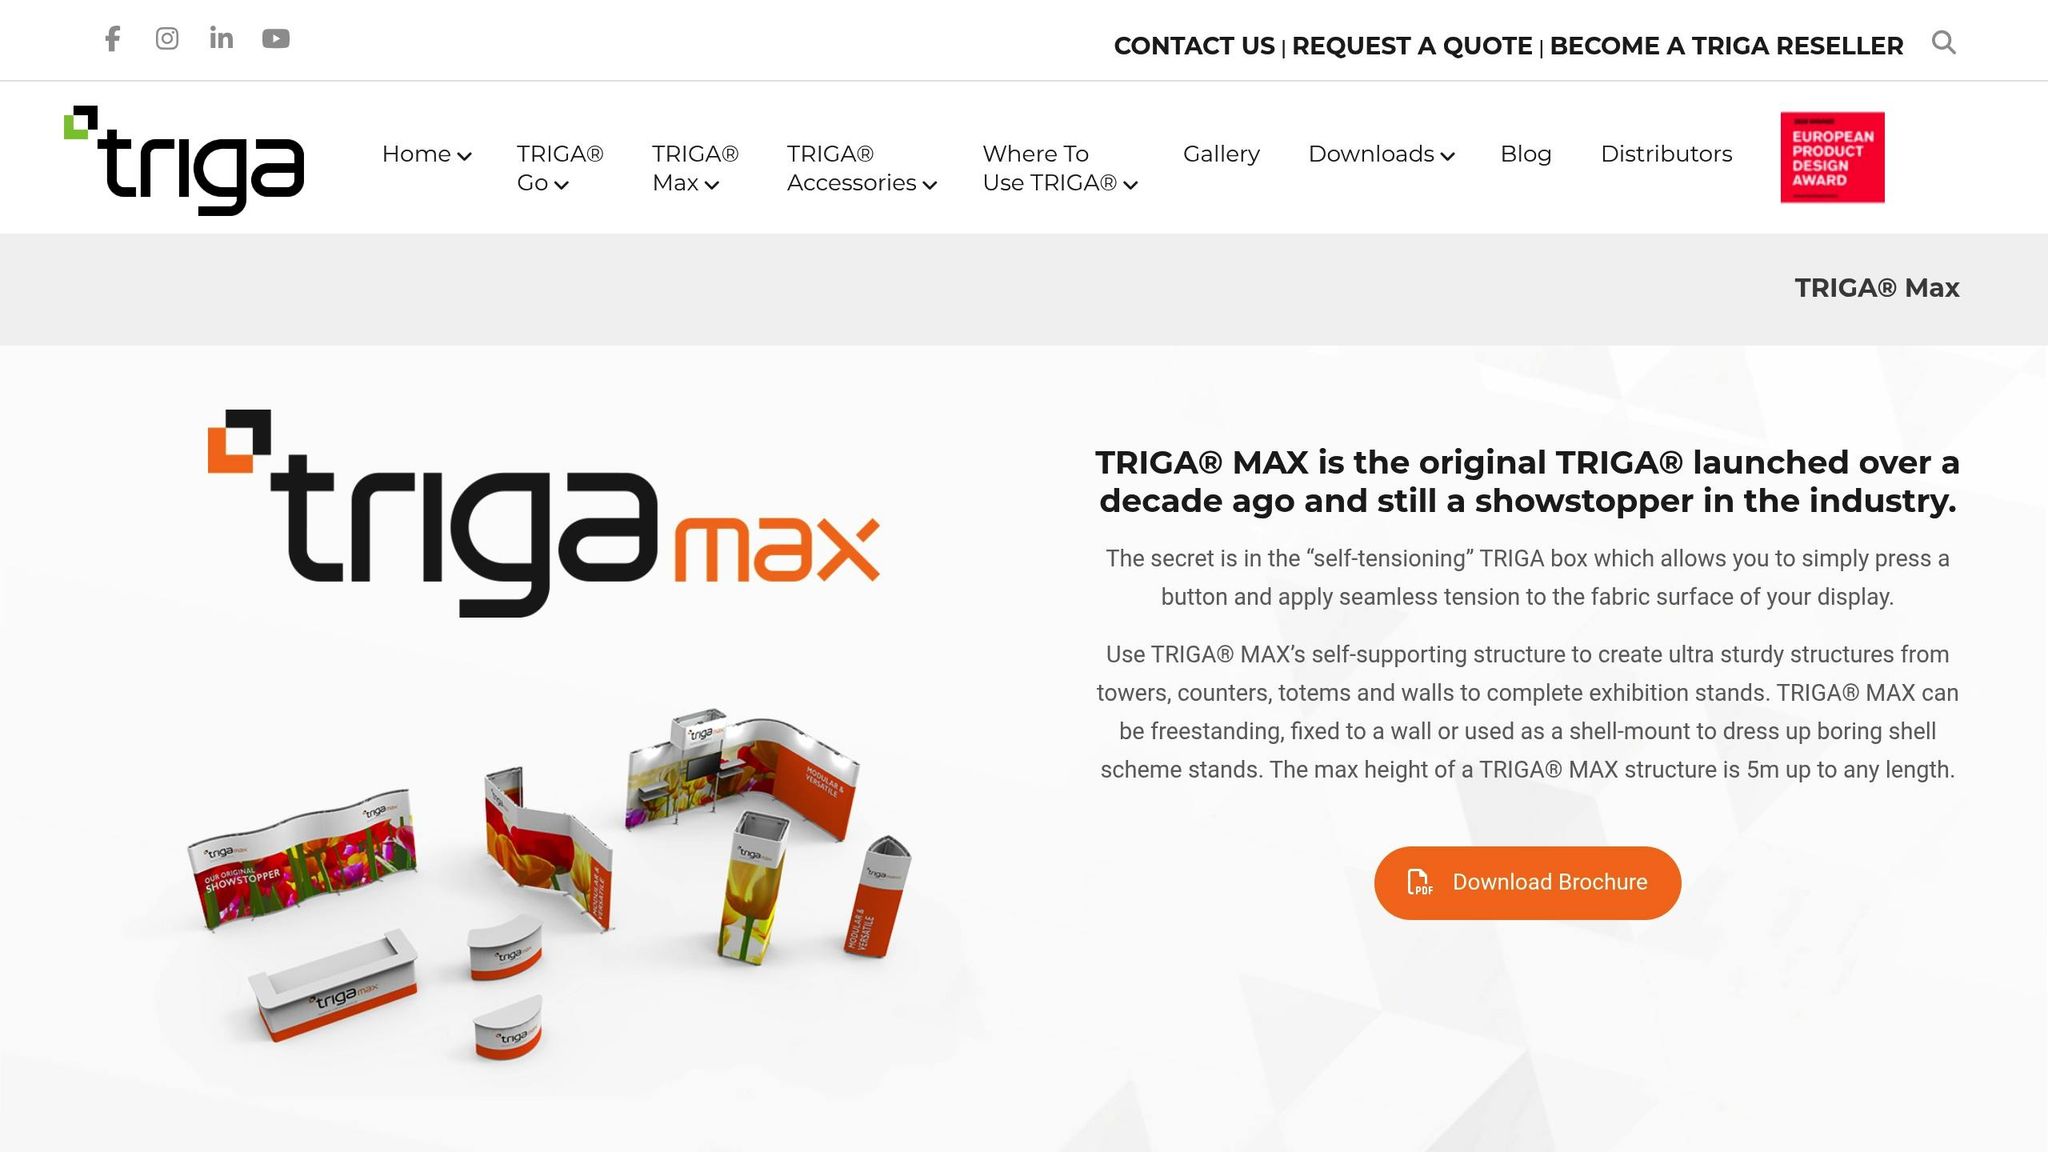
Wrinkles and sagging graphics can instantly damage your brand’s first impression. To tackle this, TRIGA MAX builds on the functionality of TRIGA GO, offering a patented self-tensioning system that ensures your graphics stay flawless. This innovative device, integrated into the horizontal crossbars and graphic rails, applies just the right amount of tension by pulling the fabric in opposite directions – top and bottom – for a perfectly smooth display [8].
Using it is straightforward: press down on the tensioner, and the fabric locks into place, stretched evenly and securely. This eliminates common problems like wrinkles, creases, and sagging, leaving you with a sleek, professional finish [5][8].
“Tensioned fabric can be stretched tightly across an aluminum frame… creating a smooth, wrinkle-free finish. That polished appearance reinforces your brand’s attention to detail and professionalism.” – TRIGA Displays [13]
Another bonus? The matte surface of the tensioned fabric minimizes glare from exhibition lighting or camera flashes. This makes your booth ideal for product demos, media interviews, or social media photos [11]. With more than 72% of new exhibitors opting for tension fabric systems, it’s clear that the visual benefits are hard to ignore [9].
Need to update your graphics? No problem. The tensioner can be released in seconds, allowing you to swap out your visuals on-site – no need to send the frame back to the manufacturer [8].
3. Integrate LED Lighting with Tension Fabric Displays
LED lighting can transform your tension fabric display into a visual standout. By illuminating the fabric from within or behind, colors appear more vibrant, and text becomes easier to read – even from a distance. This makes it easier to grab attention in just a few seconds [19].
“Signage or materials lit from behind or within tend to be more visible from longer distances – perfect for catching attendees’ eyes on a large show floor.” – Mike Kolz, Project Manager, Alexis Exhibits [18]
The installation process is simple. LED systems often come with plug-and-play connectors, speeding up the setup [19]. To get the best backlighting effect, opt for semi-transparent fabrics that evenly diffuse light, ensuring your graphics glow consistently [14]. Also, make sure all LED components match in color temperature to avoid any mismatched hues [18].
Strategic placement can amplify the effect. Use brighter LEDs at entry points to draw attention and RGB LED strips along the edges to highlight your branding [19]. Spotlights can be used to showcase specific products, increasing visitor engagement by up to 40% [20]. Illuminated booths, in general, are highly effective, capturing three times more attention and potentially boosting foot traffic by as much as 300% [20].
“If you use a less expensive fluorescent light bar or light strip, you might still achieve your desired light effect. But that kind of lighting doesn’t give you the clarity or long product life that LED lighting does.” – Cliff Couvillon, Nimlok Louisiana [19]
LEDs are not only visually impactful but also practical. They are energy-efficient, emit very little heat, and can help reduce venue costs while keeping your booth comfortable [17]. With an output of over 3,000 lumens per square foot – making them 150% brighter than fluorescent lights – and a 95+ CRI rating for accurate color reproduction, LEDs ensure your display looks sharp and professional [20]. Incorporating LED lighting into your booth design enhances its appeal and sets the stage for even more creative possibilities.
4. Opt for Seamless Dye-Sub Tension Fabric Graphics
Dye-sublimation printing is a process where heat and pressure bond ink directly into polyester fibers. Unlike traditional printing methods, where ink sits on the fabric’s surface, this technique embeds the ink into the material itself. The result? Graphics that resist cracking, peeling, or fading – even after years of use or machine washing [21].
This method also delivers a matte, glare-free finish, which eliminates reflections from overhead lighting and camera flashes. Plus, dye-sublimation allows for creating large, seamless graphics that stand out in any setting [22].
“Dye-sublimation printing uses heat to infuse ink directly into the fabric fibers. Instead of sitting on top of the material, the ink becomes part of it, creating a vibrant finish.”
– EJ Yates, Graphic Production Manager, STAR [21]
These benefits directly impact booth performance, especially at trade shows where visuals are everything. For example, in July 2025, Ryan Huckabay of Lightraiders used tension fabric displays at church resource conventions to promote a youth Bible study curriculum. The professional look of the displays attracted attendees, leading to new newsletter signups and increased interest in the program [23].
Daniel Shaker of DASH Creative Strategy shared a similar success story during a rebrand for Mauro Provisions:
“I expected color bleed from the dual prints, but the vibrant, true colors remained intact.”
[23]
To ensure the best results with dye-sublimation printing, consider these tips:
- Use the Pantone “Coated” family for precise color matching.
- Keep text at least 1.5″ from the edges to avoid distortion.
- Opt for high-contrast designs to counteract the slight sheen of polyester [10].
5. Incorporate Modular Configurations for Flexible Booth Sizes
Modular display systems allow you to reconfigure components into different booth layouts with ease. For instance, a 20×20 island booth can be transformed into a 10×20 inline display or even split into two 10×10 setups, all using the same hardware. This not only keeps your booth visually appealing but also helps you save money.
By using modular systems, you can cut shipping costs by 25–50% compared to traditional custom booths. This is because the components are designed to pack into compact, lightweight cases. Additionally, exhibitors report significant benefits: 73% noted improved scalability, and 67% experienced a comparable or even greater impact than with custom builds. In fact, 27% of exhibitors achieved better results using modular setups[24][25].
Take Quest, for example – they designed a booth that could adapt to multiple configurations, including a 20×20, a 10×15, a 10×20, and even two 10×10 displays. This eliminated the need for renting extra booths for different events[27].
“A modular booth is a trade show exhibit built from interchangeable sections or panels that can be reconfigured to fit different floor plans and design needs.”
– Ari Samaha, Featherlite[26]
When choosing a modular kit, look for one that can be split into smaller units for regional events or expanded for larger conferences. Many systems feature height-adjustable frames that can extend to 14–16 feet for spacious convention halls or collapse to 8 feet to meet venue height restrictions. Swappable graphic panels are another great feature – they let you easily update your messaging for various audiences without needing to replace the entire structure[27][28].
6. Add Portable Counters and Podiums for Functional Branding
Portable counters are a smart way to combine functionality with branding at trade shows. These versatile workstations can act as reception desks, product demo stations, or even lead-capture hubs, ensuring your booth not only looks good but also serves a purpose. With 81% of trade show attendees having buying power[1], these counters play a key role in turning casual interactions into meaningful sales conversations.
Modern designs for portable counters are all about convenience and practicality. Many models now come with lockable storage, helping you keep your booth tidy and organized[7]. Some counters even double as rollable shipping cases, cutting down on the hassle of transporting and storing separate crates[29].
“The reception counter is more than just a pretty face… It’s where the booth staff often greets attendees. It’s where promotional products, business cards, and literature are both stored and displayed.” – Exhibits NW[29]
Setup is a breeze with tool-free assembly, often involving simple snap-together aluminum frames and zip-on graphics. Take the TRIGA GO counters, for example – they feature interchangeable graphic sleeves, making it easy to refresh your branding for new campaigns without replacing the entire counter[6]. Positioning the counter at a 30–45° angle to the aisle can also create a more inviting entry point for attendees[4].
To maximize engagement, consider adding tech elements like tablets, charging stations, or QR codes to your counter. Research suggests that digital engagement stations placed strategically can increase qualified lead generation by 36% compared to static displays[30]. For industries like retail or wellness, counters with built-in shelving allow attendees to interact with products directly, encouraging longer visits to your booth[6]. These thoughtful design features ensure your booth is not only functional but also a magnet for attention.
7. Utilize Header Attachments for Elevated Visibility
Header attachments are like guiding lights on a busy trade show floor. By raising your branding above the usual display heights – often over 12 feet – these elevated signs grab attention long before attendees even reach your booth [3].
Raising your signage doesn’t just make you noticeable; it also amplifies the perceived size and authority of your booth [33]. For island or peninsula booth layouts, multi-sided header attachments ensure your branding is visible from all directions, a must when visitors approach from multiple aisles [32]. Standard rigging heights typically range between 16 and 24 feet, and for a 30×30-foot booth, experts recommend a 10×10-foot overhead sign to keep proportions visually balanced [31][32].
“Going vertical isn’t just a space solution, it’s a strategy. High-mounted graphics catch attention before visitors even reach your aisle.” – Blue Atlas Marketing [3]
When designing your header, simplicity is key. Stick to your brand name, logo, and a short tagline (6–10 words) [16][34]. Use high-contrast colors, like light text on dark backgrounds, for maximum readability from 30 to 50 feet away – even in lower lighting conditions [31][32]. Always work with vector file formats (.ai, .eps, .svg) for your graphics to ensure they scale perfectly without losing clarity [31].
Here’s a real-world example: At IMTS in June 2025, a manufacturing company swapped its generic logo header for a bold, benefit-driven message: “Cut Production Costs by 30%.” The result? A 45% boost in booth traffic and a shift in visitor questions from “What do you do?” to “How do you do that?” [1]. This example underscores how a well-thought-out header can transform casual interest into meaningful engagement, proving that elevated signage isn’t just about being seen – it’s about being remembered.
8. Choose Airline-Friendly, Ultra-Lightweight Frames
Shipping your trade show booth via freight can rack up costs in no time. Opting for ultra-lightweight frames allows you to check your entire display as airline luggage, often saving money compared to freight shipping fees [36].
If your booth weighs under 50 lbs and fits within the airline standard of 62 linear inches (length + width + height), you can avoid overweight charges and keep everything under your control from departure to arrival [37]. Carrying your booth as luggage also helps you sidestep common freight issues like delays, lost shipments, or rough handling. Did you know that 41% of booth damage comes from transportation problems rather than manufacturing flaws? [37].
Lightweight systems, such as push-pin tube frames or accordion-style pop-ups, are designed to fit into wheeled travel bags that function just like regular luggage. This makes navigating airports and event venues much simpler [36] [38].
“If you would panic seeing your booth dropped 3 feet onto concrete, don’t fly with it unprotected.” – PrintDrill [37]
Take TRIGA GO as an example. Its lightweight aluminum design minimizes parts while staying well within airline weight limits. This means you can easily transport a professional 10×10-foot display without needing freight services or paying drayage fees [35]. Pack the frame components in a padded wheeled case and include a packing diagram to make TSA inspections smoother [37].
Most airlines charge a standard fee for checked bags under 50 lbs. Go over that limit, and you’ll face overweight fees for items between 50–70 lbs. Anything heavier than 70 lbs might even be refused [37]. Sticking to lightweight materials like aluminum or high-density foam keeps your costs down and your setup hassle-free. With this approach, your booth will arrive intact and ready to make an immediate impression.
9. Enable Quick Zip-Up Assembly for Time Efficiency
Streamlining your booth setup can make a world of difference, and zip-up assembly systems are designed to do just that. These systems use lightweight aluminum snap-tube frames that interlock without the need for tools. Once the frame is in place, a tension fabric graphic fits snugly over it, secured by a heavy-duty zipper for a seamless finish [39][40][27][15].
The combination of snap-tube frames and zipper-secured fabric allows your team to set up a wrinkle-free display in record time. This approach drastically reduces labor hours and ensures your team can handle setup and teardown independently. Plus, it helps you avoid potential conflicts with union labor rules at many convention centers [27]. For example, a standard 10×10 display can be fully assembled, packed, and ready in just about 30 minutes [27].
“Tool-less designs let your own team assist with setup and teardown without violating union rules about power tools or ladders. The result: faster labor hours and the option to start packing before your crew arrives.” – Lisa, Booth Design Expert, ExpoMarketing [27]
Beyond saving time, these systems simplify transport and storage. Everything fits into a single wheeled hard case, making it easy to handle on-site [39][27]. With modular components that are intuitive to assemble, you can skip the guesswork and focus on presenting a polished, professional booth every time [40].
10. Customize Double-Sided Graphics for Multi-Angle Appeal
When it comes to trade show booths, strategic graphic placement can make all the difference. For high-traffic areas or corner booth setups, double-sided graphics ensure your display grabs attention from every angle. Considering that over 85% of trade show attendees base their first impression on visual appeal alone, this approach is a no-brainer [41].
Double-sided displays provide more room for creativity and messaging. For example, one side can showcase a bold brand statement or introduce a product, while the other side dives into details or features a call-to-action [41]. Some exhibitors even experiment with live A/B testing, using each side to gauge which message resonates better with attendees [42].
As Display Overstock puts it:
“Double-sided printing is the must-have upgrade for any exhibitor looking to make the most out of their trade show setup. This innovative feature doubles the functionality of your display by offering two unique designs in one.” – Display Overstock [42]
Want to boost engagement? Turn one side of your display into a step-and-repeat photo wall featuring your logo and event hashtag. This encourages attendees to snap photos and share them on social media, giving your brand exposure far beyond the trade show floor. After the event, these graphics can be repurposed – keep one side professional for office use and the other for event-specific messaging [42].
To maximize impact, place your most important messaging in the top third of the graphic – at eye level where it won’t be obscured by furniture or crowds [12]. Use high-resolution images (200–300 DPI) and bold, simple fonts that are easy to read from 10 feet away [12]. Remember, you’ve got just 3–5 seconds to catch someone’s attention, so make every angle count [12].
Conclusion
Your booth is more than just 400 square feet of rented space – it’s your most powerful conversation starter [1]. With 81% of attendees having buying power and only three seconds to grab their attention [1], every design choice matters.
This investment can deliver impressive returns. On average, trade shows offer a 4:1 ROI, climbing to 5:1 for Fortune 500 companies. Plus, meeting a prospect at a trade show costs about $142 – far less than the expense of an in-person office visit [43].
Start with the basics: choose wrinkle-free tension fabric for a polished look, use LED lighting for maximum impact, and opt for modular setups that adapt to your needs. Boost engagement further by adding portable counters, elevated headers, and quick-assembly systems – freeing your team to focus on meaningful conversations rather than setup hassles.
“Attendees make snap judgments within seconds. A striking entrance communicates that your brand values creativity, confidence, and hospitality.” – ProExhibits [2]
FAQs
What’s the fastest way to make my booth stand out in 3 seconds?
The fastest way to make your booth pop is by incorporating bold, high-contrast visuals that demand attention right away. Think oversized graphics, dynamic LED displays with movement, or dramatic silhouettes. These features help your booth stand out, even in the busiest expo environment.
How do I choose the right modular layout for different booth sizes?
When selecting a layout for your booth, think about your space and objectives. For smaller setups, like a 10×10 booth, make the most of vertical space by incorporating compact, modular panels that don’t overcrowd the area. If you’ve got more room, such as a 20×20 space, opt for reconfigurable components that can adapt to different layouts. The key is to prioritize flexibility, so your booth can easily adjust or expand for various events, keeping it functional and visually appealing.
What should I pack to fly with my booth as checked luggage?
When you’re flying with your trade show booth as checked luggage, packing it right is crucial to avoid any damage. Use durable containers or transport cases that can handle rough handling. For fragile parts, add plenty of padding to keep them secure. Disassemble the booth into smaller, manageable pieces to make packing and transport easier. Make sure to protect graphics, panels, and frames from any potential impact during transit. Lastly, label all boxes as fragile to alert handlers. Taking these steps helps ensure your booth arrives in one piece, ready for the show.